How often do you take iPhone photos around your home? Sometimes we’re so preoccupied with seeking out new photography locations and subjects that we miss what’s right in front of us. In this article, you’ll discover 14 creative tips for shooting some really imaginative iPhone photos… without even stepping out of your front door.

While the constraints of shooting at home can be challenging, it also forces you to be more creative with lighting, composition, and subject matter.
With a little imagination and creativity, you’ll begin to see your home surroundings in a new way. And you’ll be surprised at how many indoor subjects look truly amazing through the lens of your iPhone. The following tips will help get you started.
1. Shoot From Unusual Angles
An easy way to create an interesting photo of an everyday object within the home is to photograph it from an unusual angle. The aim is to try and show the object from a unique angle that the viewer hasn’t seen before.
Try shooting your subject from a very low angle or high angle to see how this affects its appearance in your image. Take photos from different sides of your subject, or even from inside of it.

This is the inside of a light shade taken from directly below. You normally look at a light shade from the outside, but this photo shows a different perspective that you wouldn’t normally see, and is therefore more stimulating for the viewer.
2. Simplify The Scene
The problem with shooting in confined spaces with your iPhone is that you can end up with unwanted background distractions in your picture.
Once you’ve chosen the subject you want to photograph, simplify the scene so that your main subject stands out against a clean background.
This might mean moving your subject to a different position or even into another room. You could also place a plain piece of paper behind your subject or shoot from a different angle to eliminate distracting elements from the scene.
A simple composition will create a much more powerful image, focusing the viewer’s attention on the main subject.
3. Fill The Frame
Another effective method for eliminating a busy background is to fill the entire frame with your subject. This technique places maximum emphasis on the subject, with nothing else to distract the eye.
Don’t be afraid to get really close, but make sure your iPhone can still focus on the subject – if you’re too close the entire image will be blurred. And don’t worry that you can’t fit the whole subject in the photo.

Filling the frame with this single cabbage leaf removed the busy background of the kitchen. It also allowed me to capture the intricate detail and texture that you wouldn’t see if it had been shot from further away.
4. Make Use Of Natural Light
Windows are really important when photographing indoors as they’re your only source of natural light to illuminate your subjects. Placing the object you’re photographing in or near a window is a great way of illuminating your subject.
Look for interesting light coming through windows at different times of the day. The golden hours of dawn and dusk will produce some beautiful warm lighting for your photos.

White or light-colored semi-transparent curtains or blinds work really well at diffusing strong sunlight, so if you’re shooting in the middle of the day this can help soften the light. Alternatively, hang a white sheet or white piece of paper over the window to act as a diffuser.
Diffusing the light creates a softer, more flattering light and helps to eliminate shadows created by a strong directional light source.
5. Include Windows In Your Photos
As well as being a source of natural light, windows make great subjects in themselves. There may be a pleasant view outside, or the window itself might be the main point of interest. At night, you can create some really moody shots of windows using just the moonlight or street lights outside.
If you’re photographing a view out of a window, try including some or all of the window frame. This will add context to the scene and can form a frame around the edge of your photo.
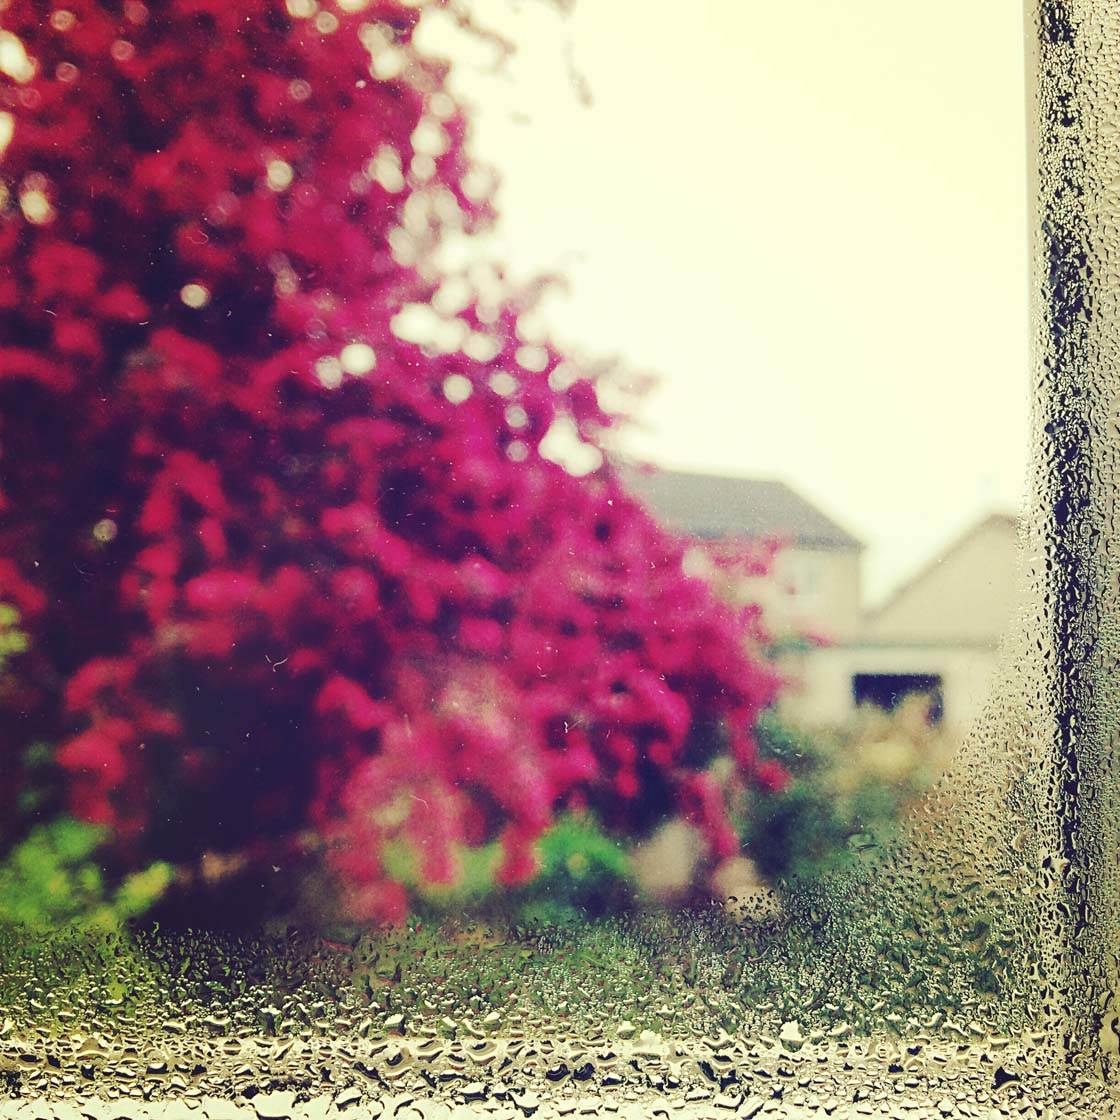
Originally, I was focusing on the pink blossom tree in this scene. But then I noticed the condensation on the window and decided it would be a more interesting photo if I focused on this rather than the tree.
In bad weather, you can achieve some fantastic results by photographing through the raindrops on your window panes.
6. Experiment With Artificial Light
As well as using natural daylight to illuminate your subjects, you can also use artificial light. Lamps are the most obvious source of artificial light. They can be used to light up your subject in the absence of natural light, and they also make interesting subjects themselves.
When using lamps, consider the color cast that you’ll get from different types of bulbs as this will influence the overall color of your image.
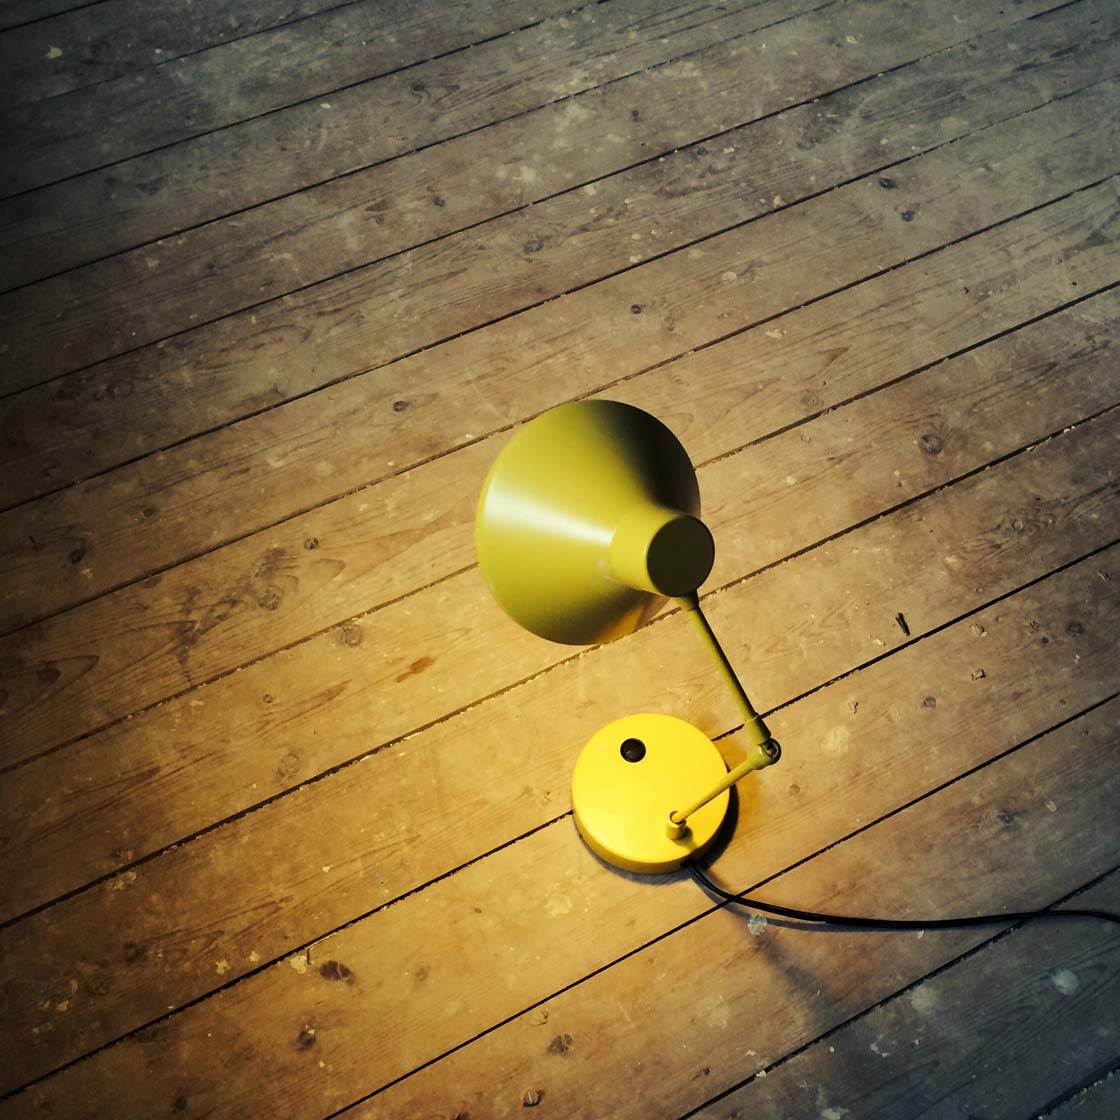
The ordinary incandescent bulb in this lamp creates a warm orange/yellow light, but other types of bulb will create different color casts. LED bulbs can give off a cold bluish light, while fluorescent bulbs can produce a greenish light.
As well as lamps, you probably have several other artificial light sources in your home that you could use to light up your subject in interesting ways.

In this image, my nephew’s face is lit up solely by the iPad in front of him. Try using different electronic devices such as your iPhone, computer, torches or even the light from your refrigerator to illuminate your subject.

Candles create a lovely warm glow in your images and are a great way of adding atmosphere and intimacy to a photo.
7. Backlight Your Subjects
Backlighting is simply where the main light source is behind your subject. You could use the light from a window or a lamp to backlight the object you are photographing.
Backlighting is required for creating silhouettes. Simply position your subject in front of the light source, tap on the screen to set focus where you want it, then swipe down on the screen to reduce exposure until your subject appears as a dark silhouette against the bright background.
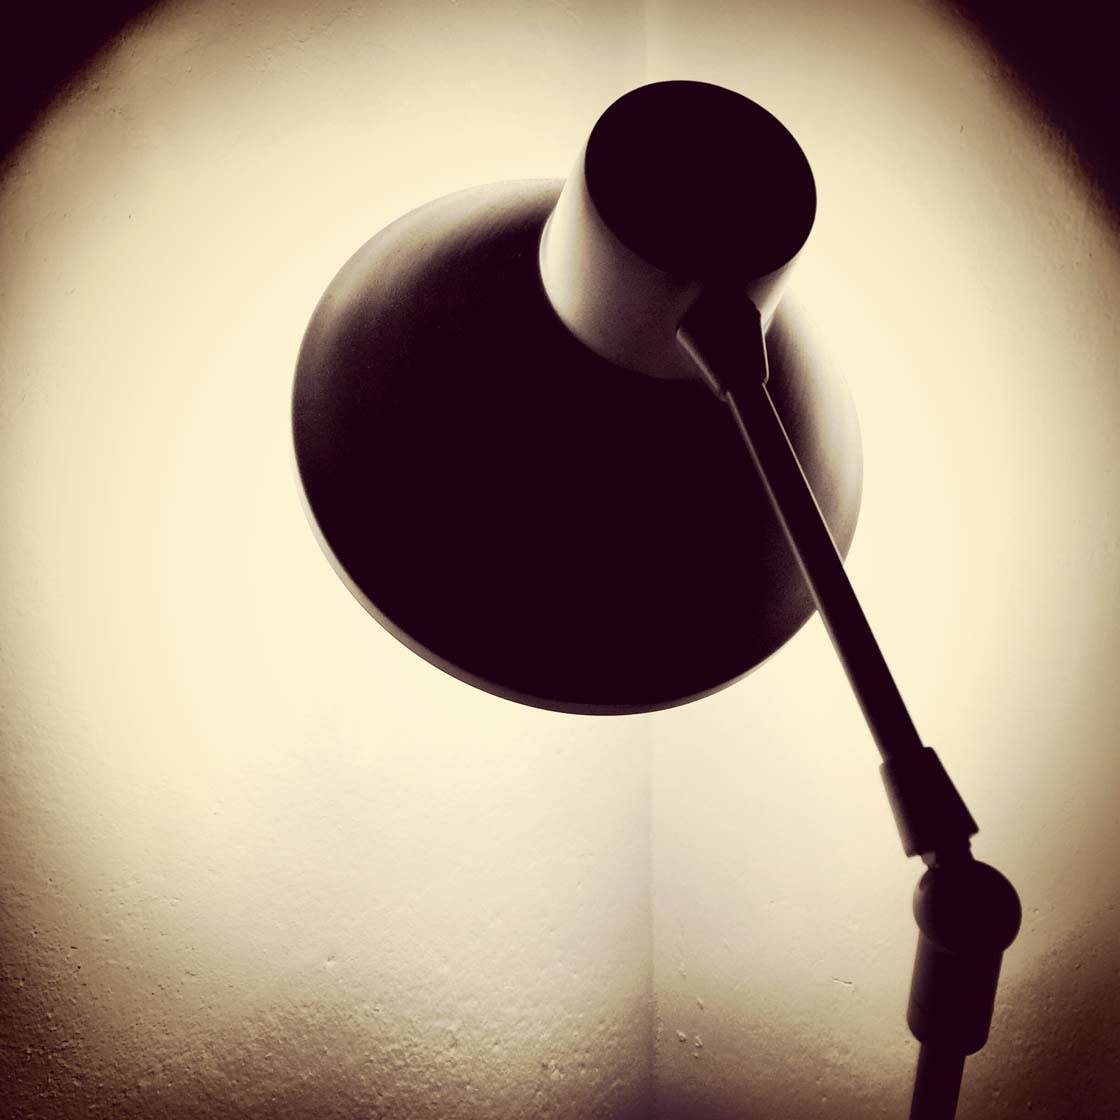
In this photo, I shone the light from the lamp into the corner of the room.The light reflected off the white walls creating a light source behind the lamp. I then simply reduced the exposure to create a strong silhouette shape of the lamp.

Backlighting also works really well when photographing semi-transparent objects. The light behind the subject will shine through the object, revealing hidden detail and making the colors pop. When photographing this leaf I simply held it up against the window so that the sunlight shone through it.
8. Photograph Shadows
Look around your home for interesting shadows created by ordinary household objects. You can easily create a shadow by placing your subject in front of a wall and then shining a light towards the wall and subject.

Experiment with the angle of light to change the position of the shadow in relation to the subject. You can increase or decrease the intensity of shadows by changing the distance between your subject, the light source and the surface the shadow is being created on.
You could include the object together with its shadow as in the photo above, or try photographing just the shadow on its own as shown in the photo below.
Make sure the shadow of you or your iPhone doesn’t get included in the photo. You may need to experiment with shooting from different angles to eliminate your own shadow.
9. Seek Out Patterns
Look out for interesting patterns in objects around your house. Filling the frame with the pattern can create some really unique abstract images.

This glass bowl had an intricate pattern that I wanted to photograph. After shooting it from a number of angles without good results, I held it up to the window and filled the frame with just this part of the bowl. The light shining through the glass and the close-up composition accentuates the pattern and texture of the glass.
10. Utilize Color
Color has a big visual impact on your images and can evoke strong emotions in the viewer. Filling the frame with the color of your subject is a great way of making the color itself the main focus of the image.
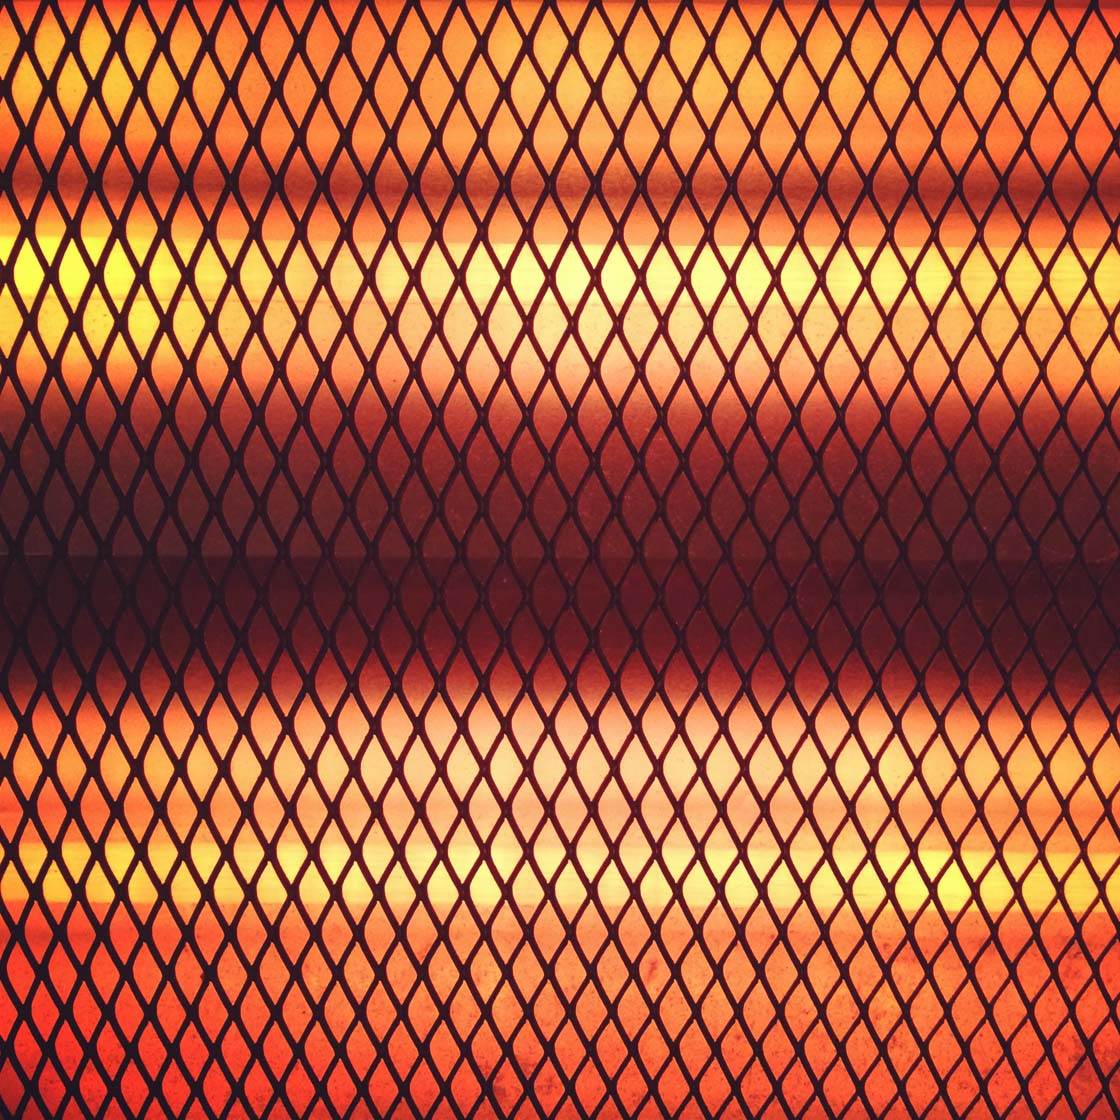
This is a photo of an electric fire. Filling the frame with the pattern of the metal mesh and the symmetrical bands of orange creates a colorful abstract image with a lovely warm glow.
A fun project for home iPhone photography is to shoot lots of items of the same color. You could then create a photo collage to display a whole array of images with a particular color scheme.
11. Take Portrait Photos
Your home is a great place for taking portrait photos as you have plenty of time to experiment with different lighting and composition. You could use light from a window to illuminate your subject from the front, side or back – all with different results.
In the absence of daylight, try using lamps or candles to light your subject. If your kids or pets won’t stay still, photograph them while they’re sleeping!

Remember to try and eliminate distracting backgrounds. You can do this by moving your subject to a different position, changing your shooting angle or getting closer to your subject.
Don’t be afraid of getting really close to your subject, even if this means not including all of their head in the frame. This type of composition for portraits is often really effective.

Getting close and filling the frame really shows off the texture and detail of the cat’s fur in this picture.

Portraits don’t always have to include the person’s face. Hands, feet and jewellery also make great subjects when photographing people.
12. Document A Project Or Activity
Photographing the different stages of a project or activity can create an interesting set of images that tell a story. This could be any activity that involves a number of steps, such as a DIY or craft project, children playing a game, baking a cake, etc.
A great way of displaying a series of photos like this is to create a collage using an app such as Diptic.
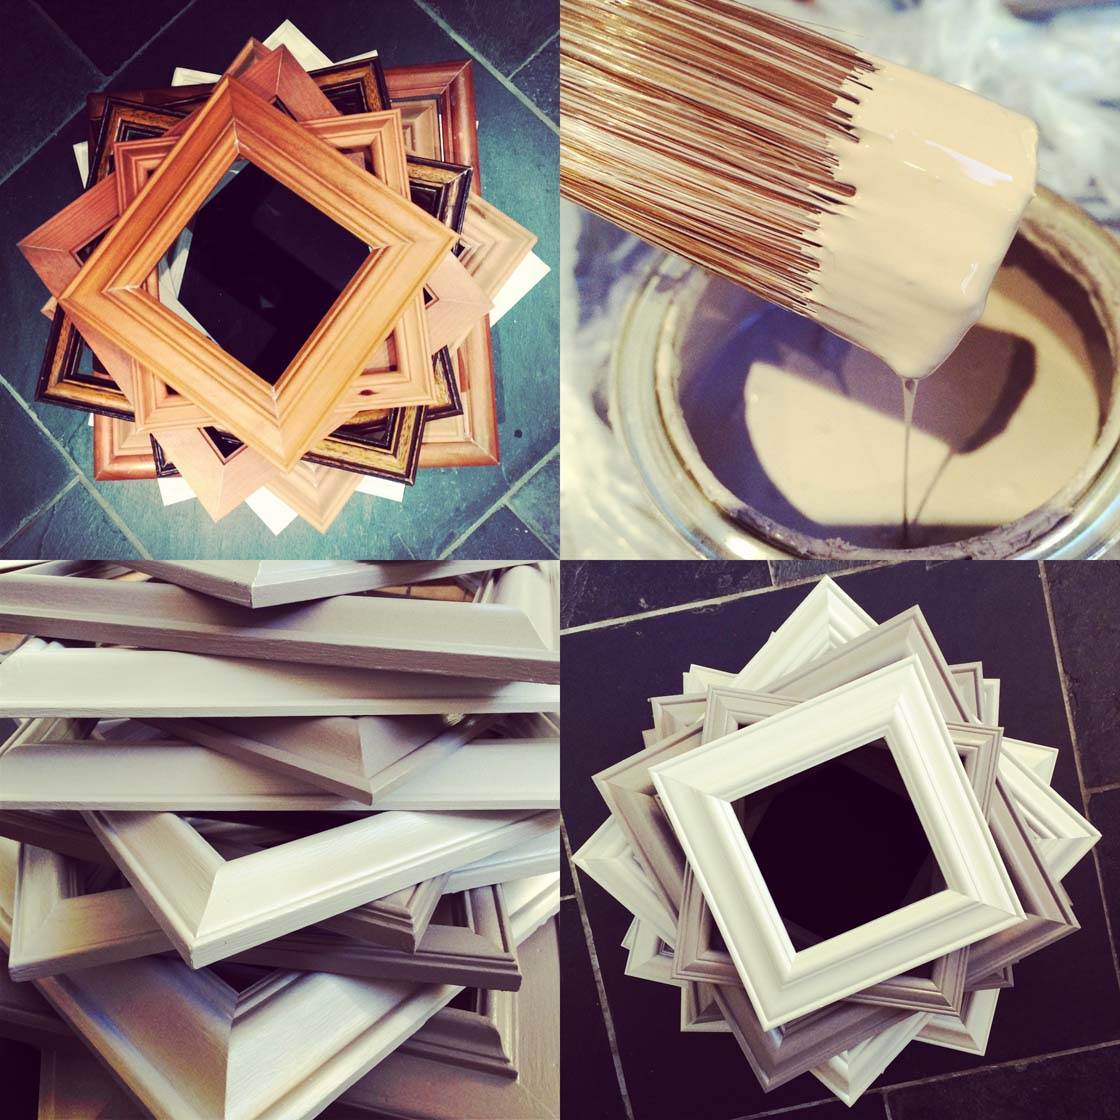
This collage of four photos shows the different stages of painting some old picture frames. It captures the process and detail of the activity from start to finish.
13. Capture Decay & Texture
I love to photograph objects that show age and decay. These kinds of subjects will have fascinating textures that are great for bringing your photos to life and giving them a tactile quality.
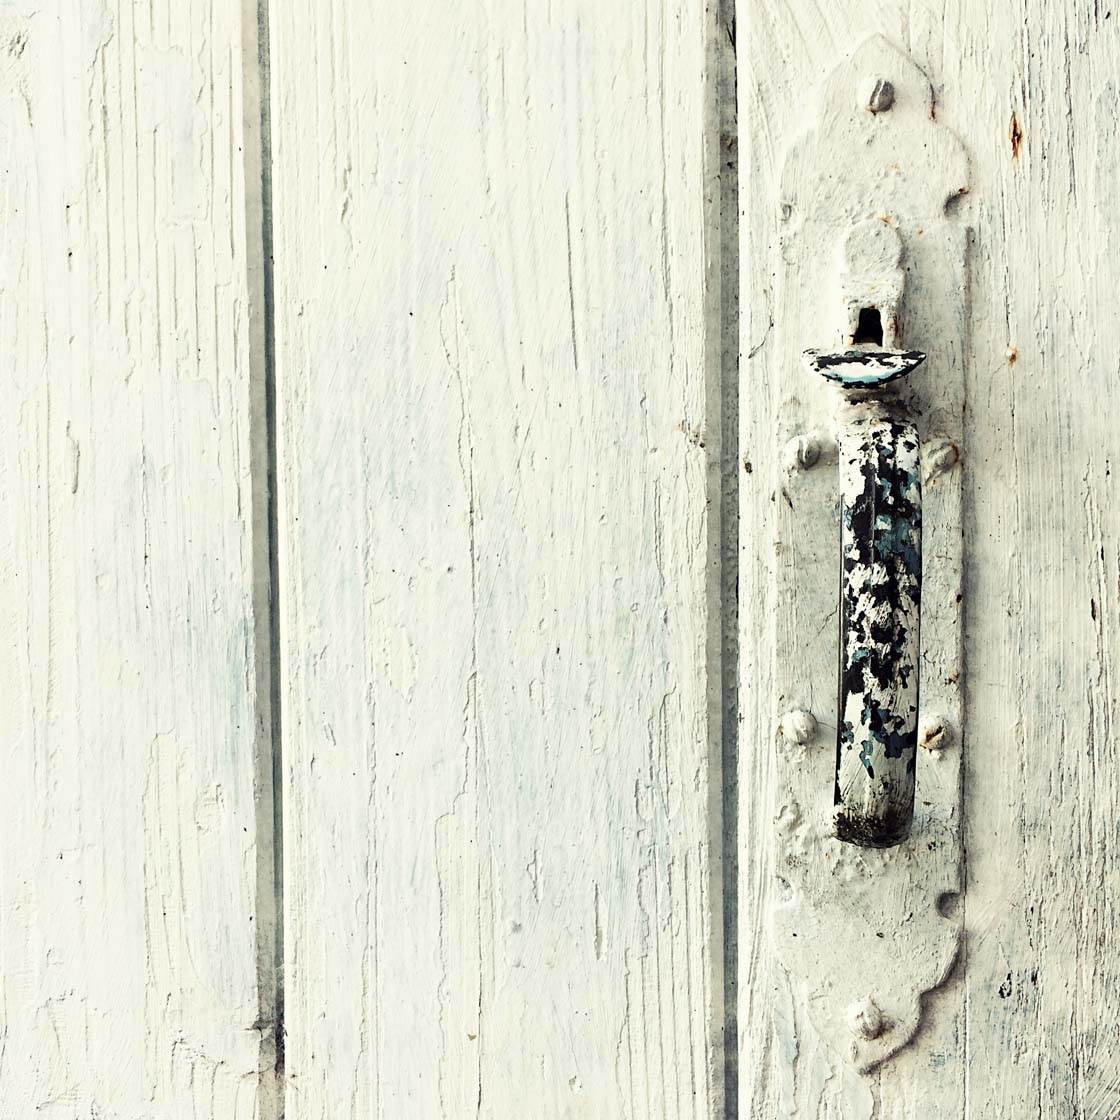
Old doors, peeling paint, rusty pipes and cobwebs all make great subjects for this kind of photography. Their textures will stimulate the senses, especially if you shoot from close-up to show the detail of the decay and texture.
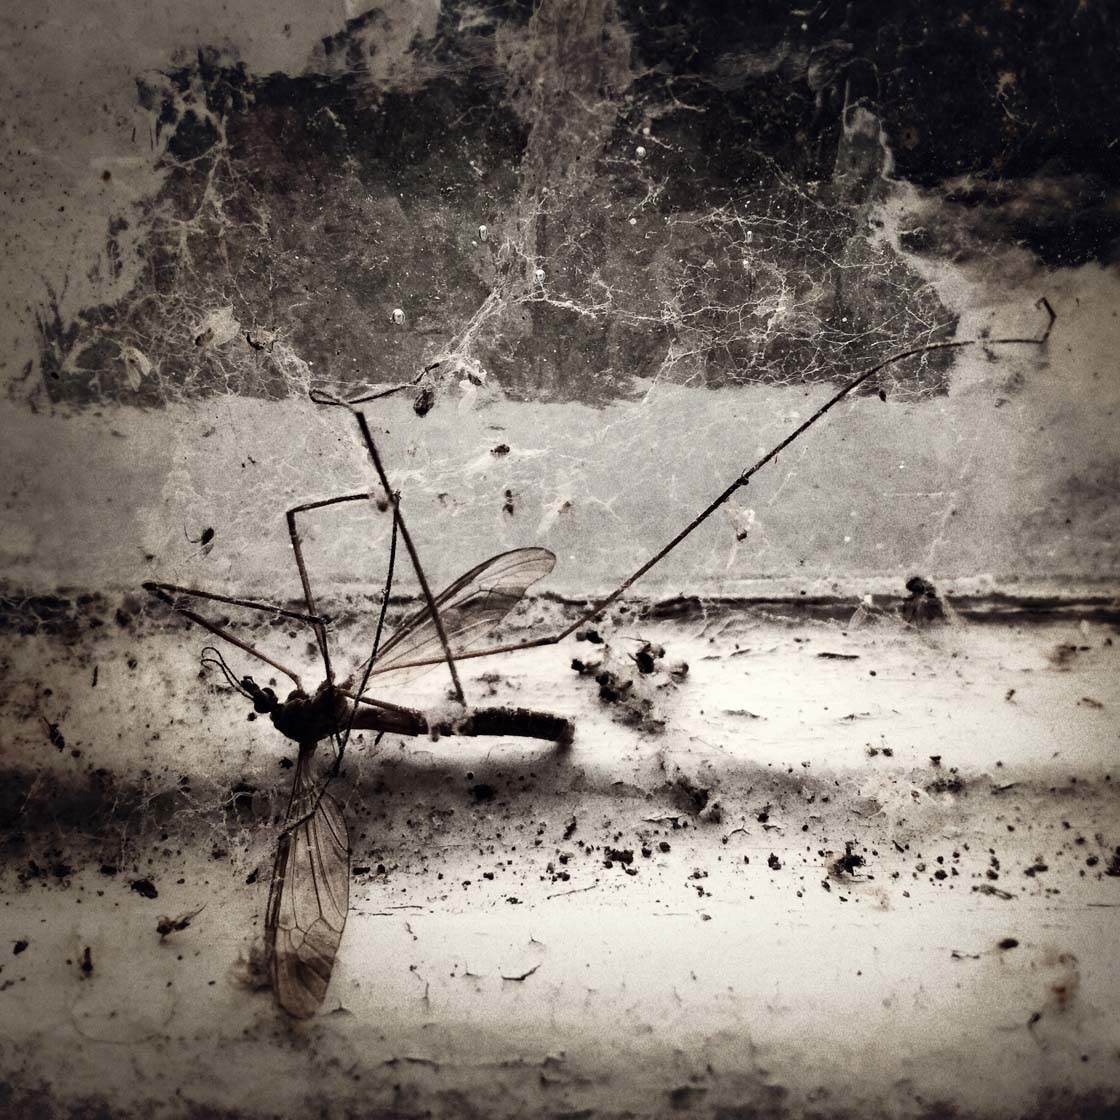
I barely noticed the insect on the windowsill of this old porch, but photographing it close-up and using natural light from the window creates a really powerful image.
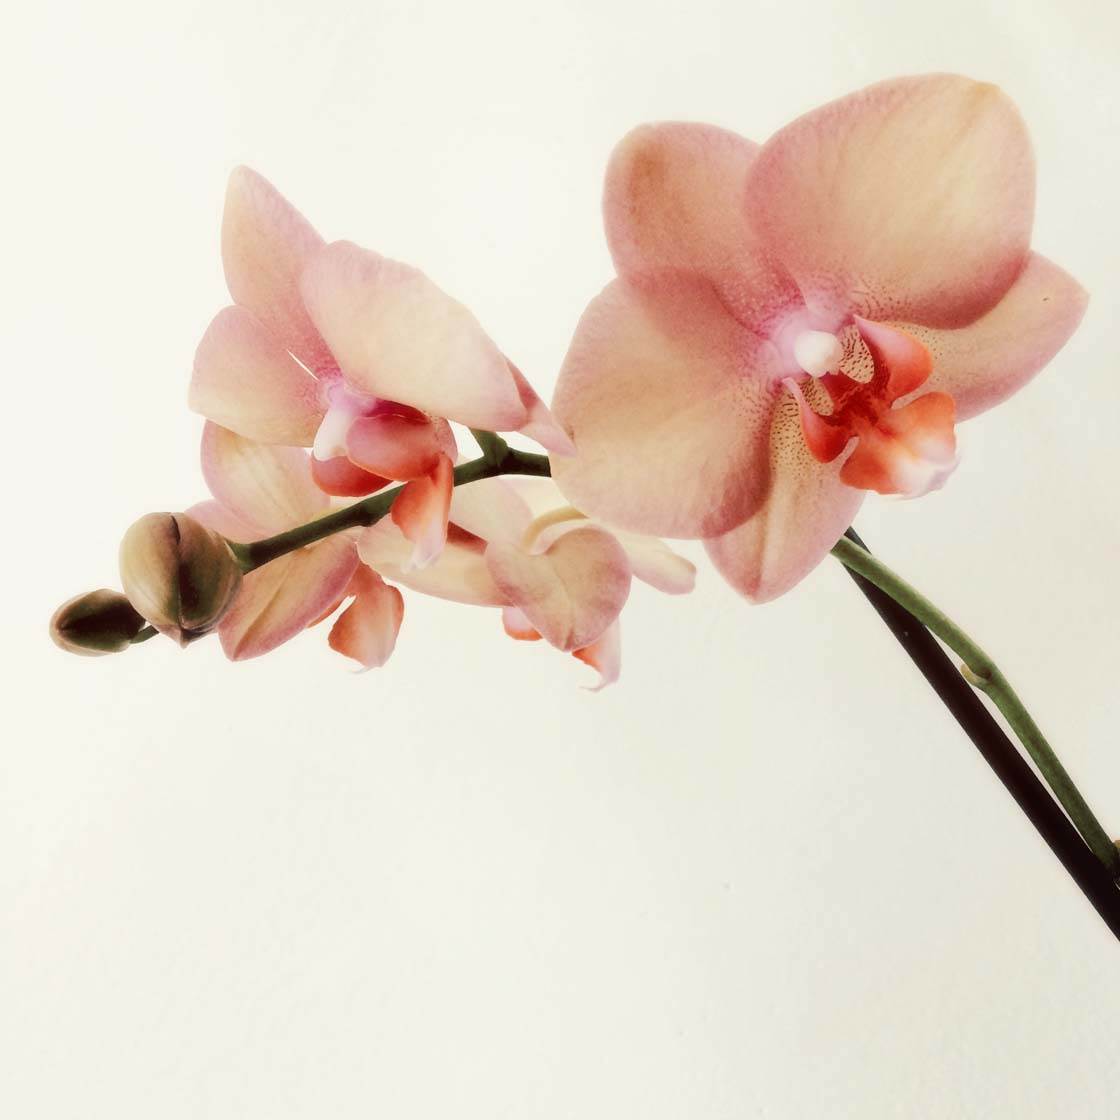
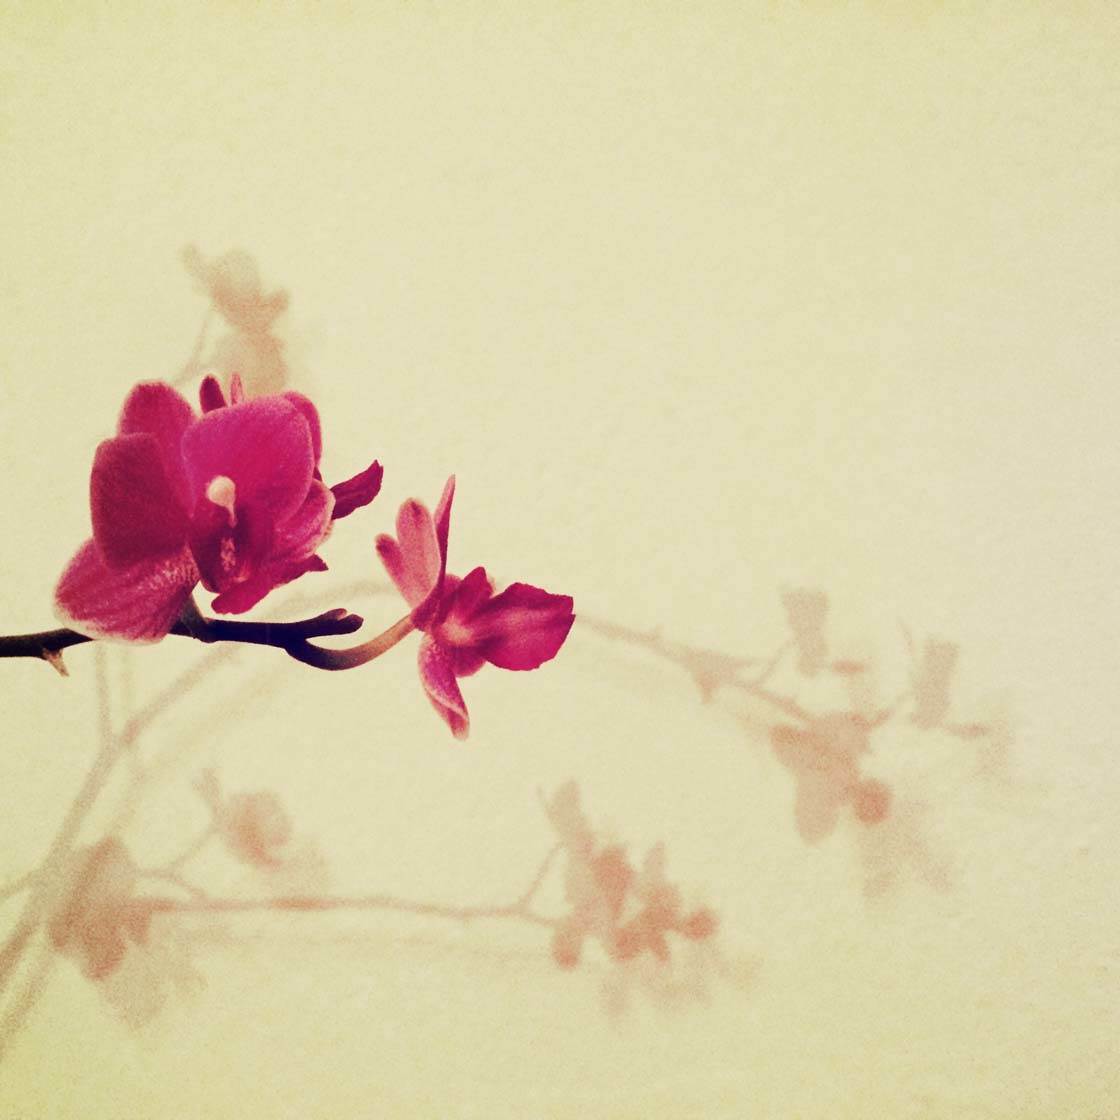
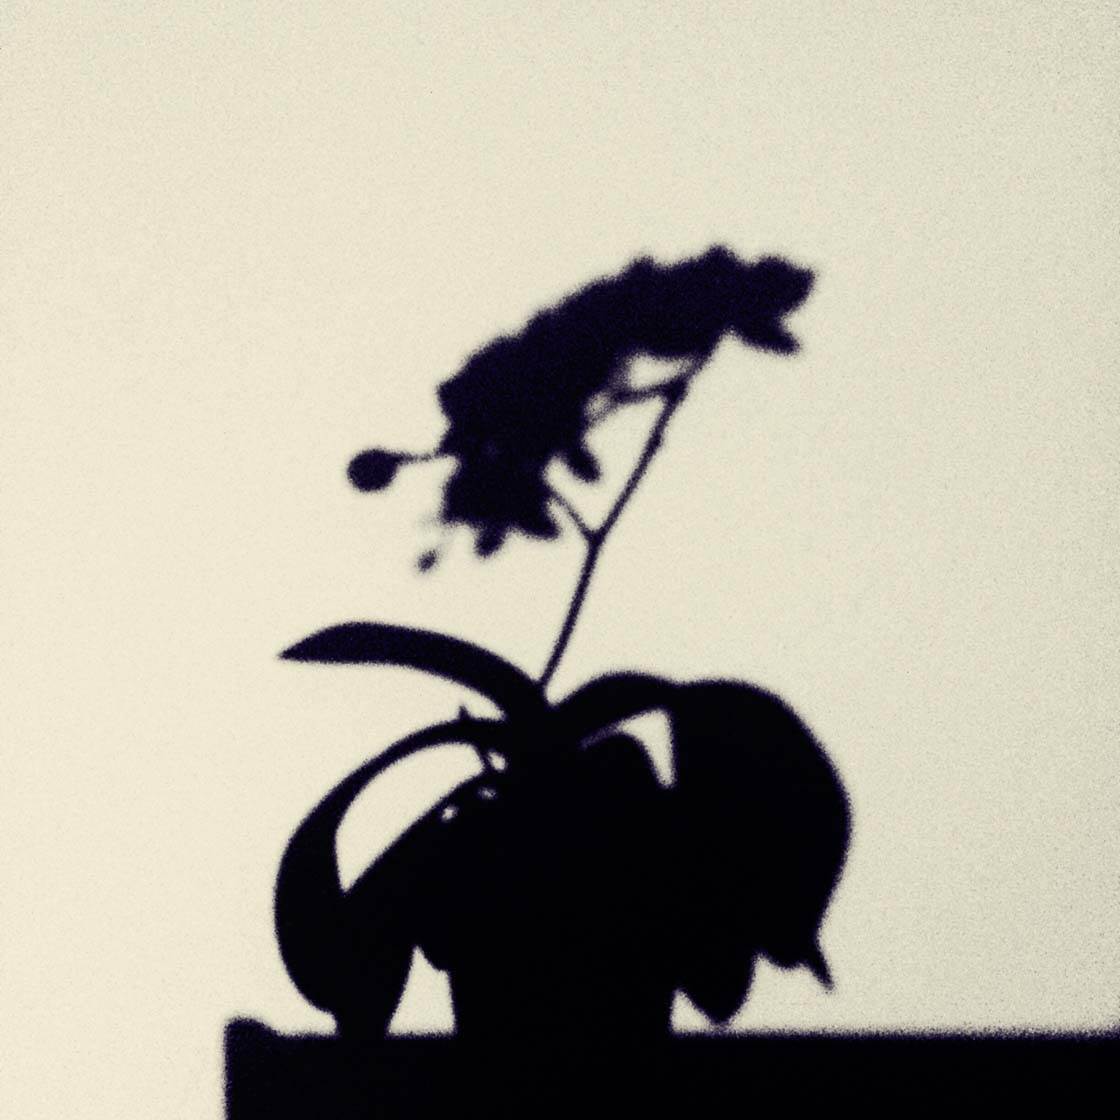
14. Think Creatively
The key to taking great iPhone photos at home is to think creatively and experiment with different techniques. Recently I’ve been experimenting with shooting through a variety of glass items with some interesting results.
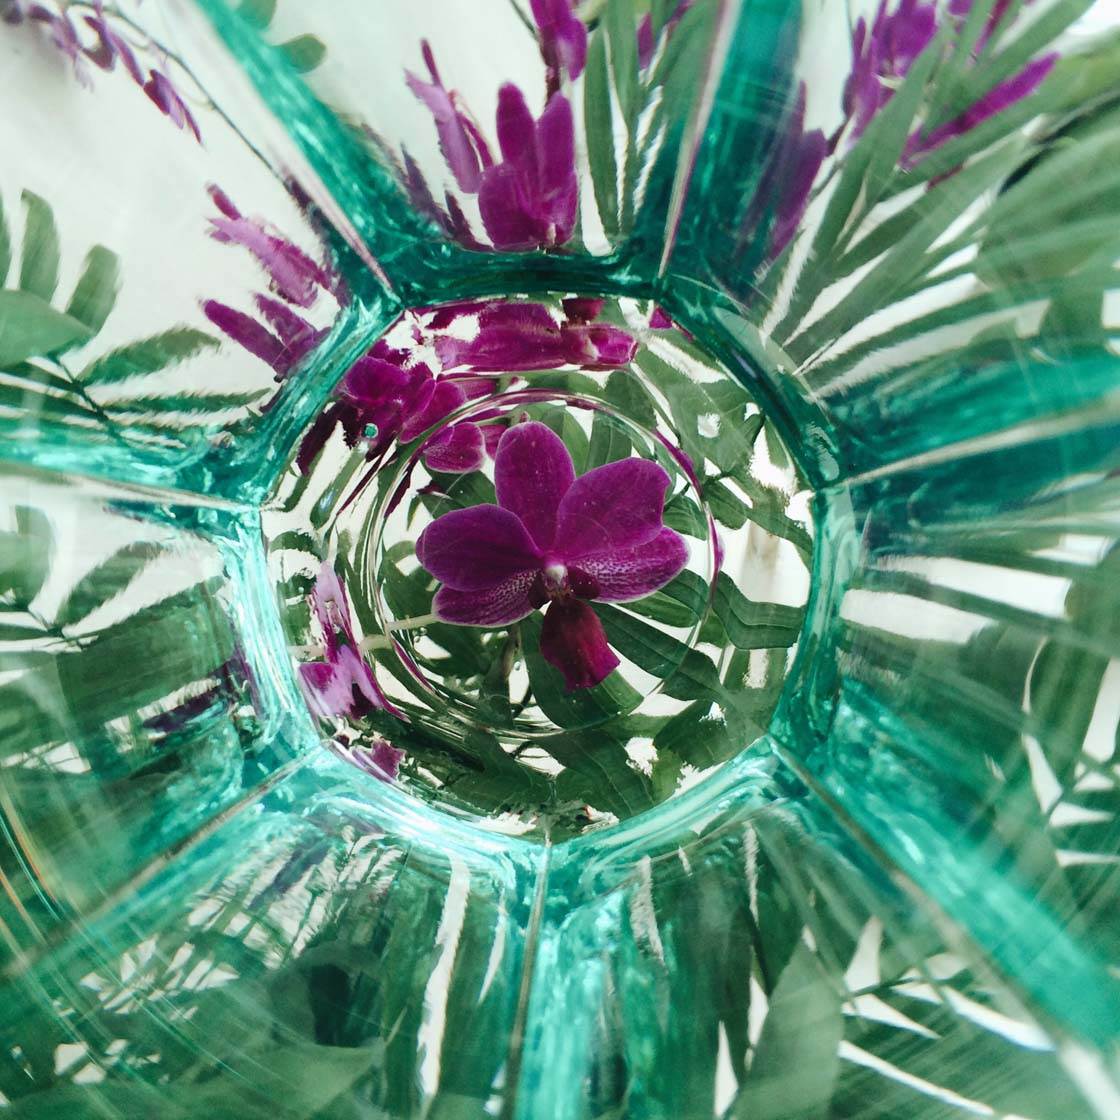
I took this photo of an orchid through the top of a green drinking glass. It creates a unique frame around the edge of the photo and the lines draw your eye towards the main flower in the middle The glass has also created some interesting distortion of the leaves and flowers.
To get more creative with your photography you have to start thinking outside the box. Explore your home for creative opportunities and experiment with different techniques until you find something that works.
Home iPhone Photography Challenge
If these tips have inspired you, next time you find yourself at home with nothing to do, try setting yourself the challenge of spending one hour taking as many photos as possible.
You could try shooting at various times of the day to make use of different types of light, or you could limit your challenge to a certain theme such as shadows, kitchen items, flowers or a particular color scheme.
Experiment, take lots of photos, and above all, have fun!
