To coincide with the launch of the new iPhone 6 and iPhone 6 Plus, Apple has released their new iOS 8 software update today. iOS 8 has a huge range of new features, including some exciting updates to the native Camera app and Photos app. In this tutorial, you’ll learn how to install the update and use these brand new iPhone camera features.
iOS 8 is a free update and will be compatible with the following devices: iPhone 4s or newer, iPod touch 5th generation, iPad 2 or newer.
To update your iPhone (or iPad/iPod touch) to iOS 8, simply go to Settings > General > Software Update, then follow the on-screen instructions.
Note that updating takes about 30 minutes or more, and you won’t be able to use your iPhone while the new software is installing.
Once you’ve updated your device to iOS 8, you’ll be able to use the new photography features as shown below.
New Camera App
The updated Camera app in iOS 8 includes three new features: a manual exposure adjustment, a self-timer and a time lapse video mode.
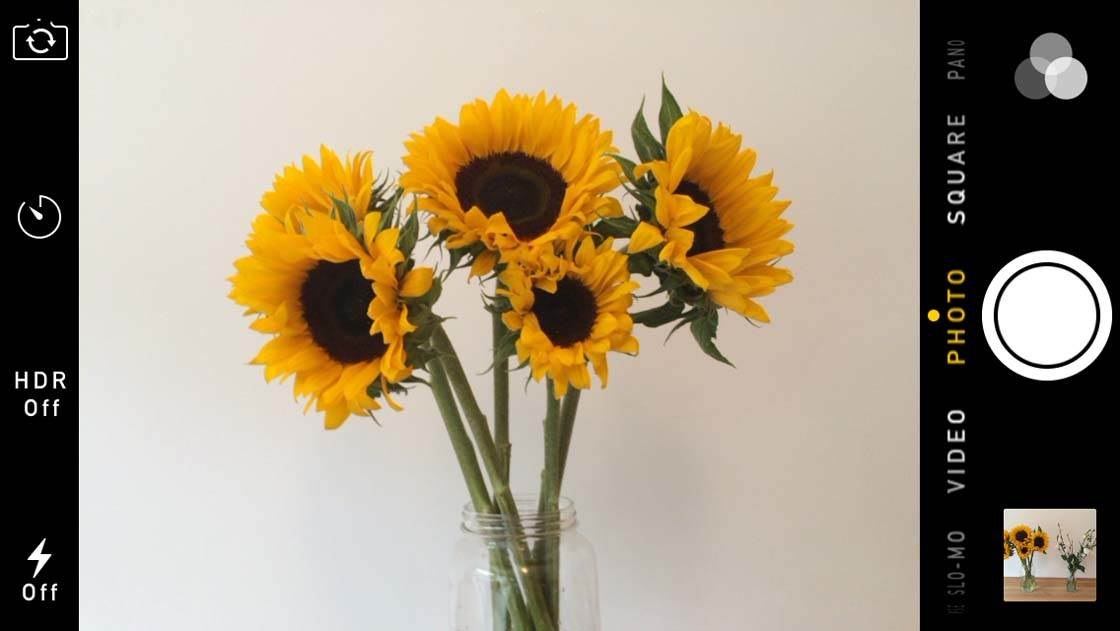
Manual Exposure Adjustment
This is a fantastic new tool which is going to make such a difference when trying to get the right exposure using the native Camera app.
Previously, you had to set focus and exposure together, which was often frustrating as you might want to set focus for one part of the scene and exposure for another.
You could use other camera apps such as Camera+ to take photos with separate focus and exposure points, but now you can use the native Camera app to set the focus and then manually adjust the exposure before taking the photo.
Start by tapping (or tapping and holding) the part of the screen that you want to set focus for – this would normally be on the main subject of the photo to ensure that it is in sharp focus.
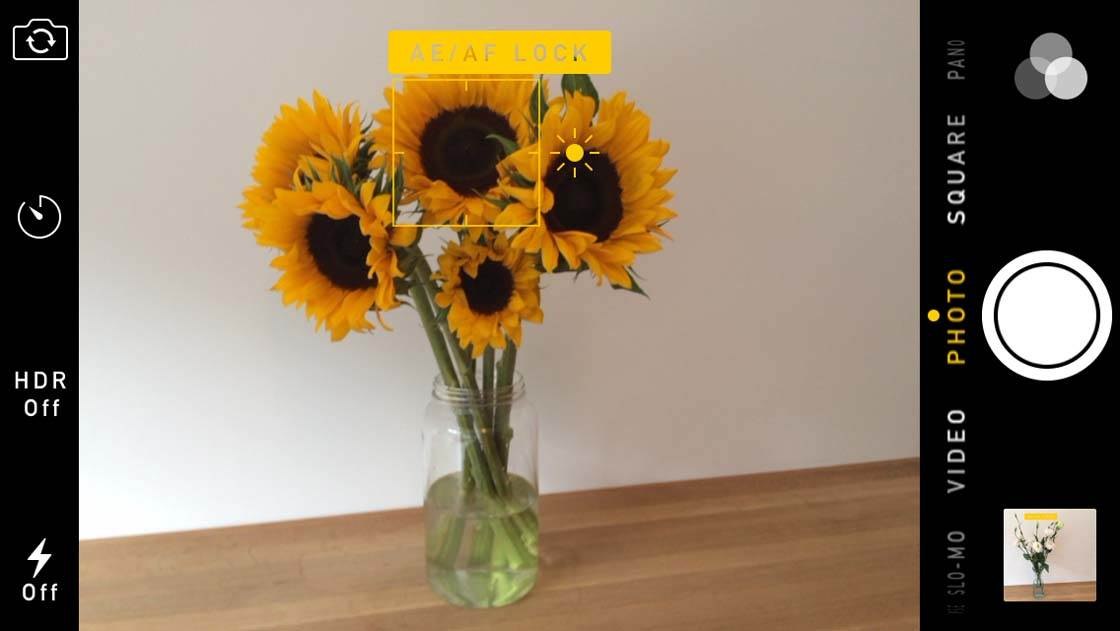
When you tap to set focus, a yellow square with a sun icon appears where you tapped to indicate the focus point. This is also the point that the camera has set exposure for.
However, often the exposure that the camera sets based on the focus point doesn’t look good. In the sunflowers photo above, the exposure of the image is a bit dark.
Now, here comes the good bit! If your photo looks too bright or too dark, you can now adjust the exposure without changing the focus point.
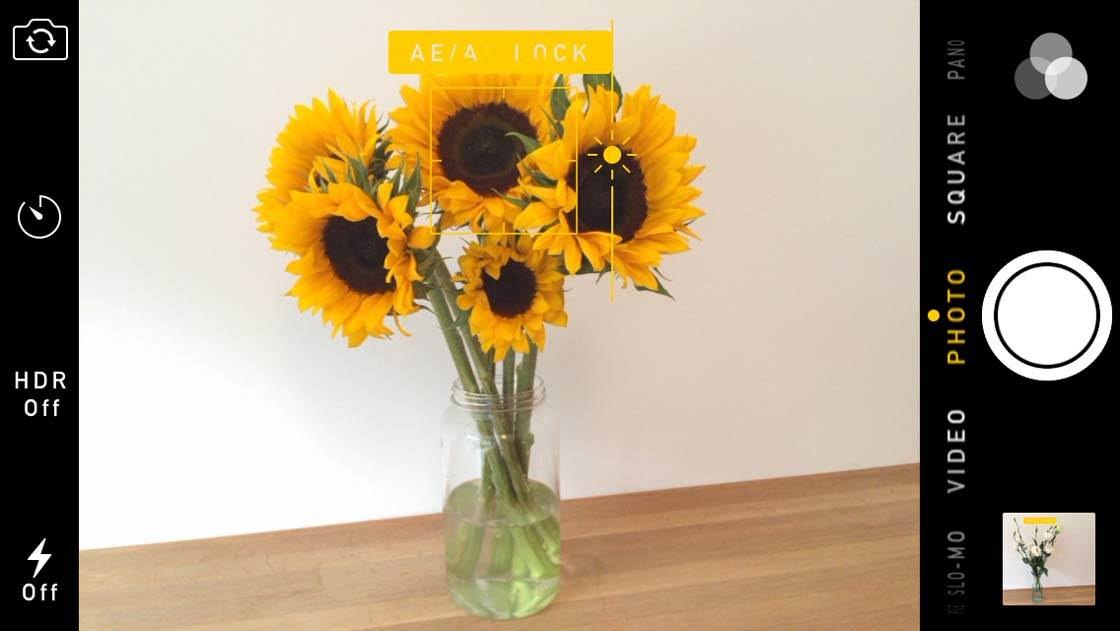
Simply swipe up or down anywhere on the screen – up to make the image brighter or down to make it darker. As you swipe up or down you’ll see the sun icon move on the slider.
If you want to start again and focus/expose for a different part of the scene, simply tap on a different area of the screen and start again.
It really is that simple, and it’s going to make the world of difference to how you expose your iPhone photos.
Self-Timer
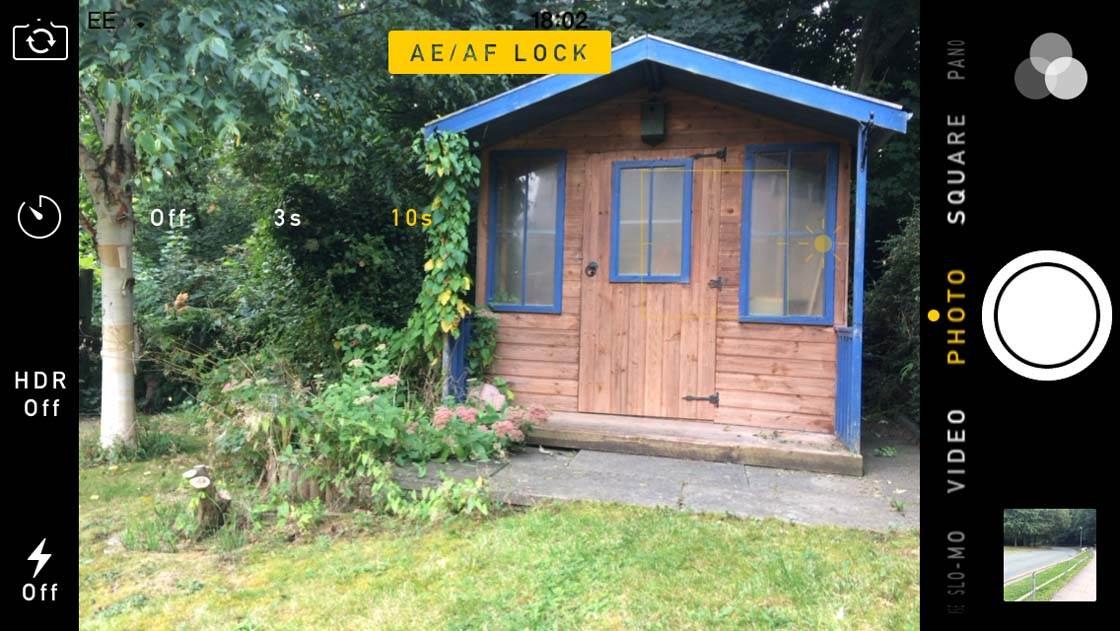
The native Camera app now includes a self-timer. This enables you to set a 3 second or 10 second delay when taking photos.
This is great for when you want to be in the photo yourself. It’s also useful if you’re taking photos in low light with an iPhone tripod where pressing the shutter button might introduce camera shake.
In the Camera app, tap the self-timer button (clock icon) on the left of the screen, then set the delay to either 3 seconds or 10 seconds.
Compose your shot, then tap the shutter button. A numbered countdown will begin on the screen, and the flash on the back of the phone will flash continuously to indicate that the timer is counting down.
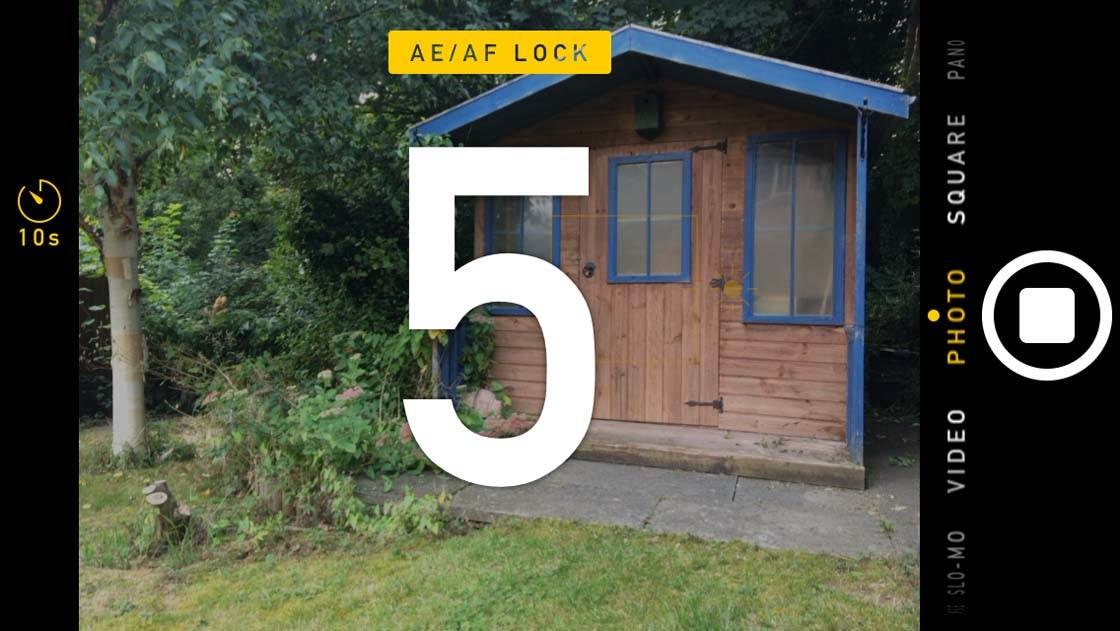
The really great thing about the timer is that when the photo is taken it uses burst mode, taking 10 shots in quick succession. You can then choose the best photo or photos, just as you normally would when using burst mode.
Time Lapse Video
If you have the iPhone 5s you may have experimented with the Slo-Mo video mode which lets you create slow motion video footage.
In iOS 8 you can now also create time lapse videos which enable you to film a scene over a period of time and then speed up the footage so that everything appears to move much more quickly.
To access time lapse video mode, swipe through the list of shooting modes (video, photo, square, pano, etc.) next to the shutter button until Time Lapse is selected.

You can set focus and exposure in the same way as when you take a photo, then tap the shutter button to start recording. Tap the shutter button again to stop recording. When you play the video the footage will appear sped up.
With the recent launch of the new Hyperlapse app by Instagram, everyone is talking about time lapse videos, so this might be a popular addition to the Camera app.
However, it doesn’t have the same choice of options as Hyperlapse, such as being able to choose the rate at which the footage is sped up or the option to share on Instagram. So if you’re serious about time lapse photography, the native Camera app may not offer you all you need.
New Photos App
The Photos app has been redesigned to include extra editing tools, search options, a favorites option, a “recycle bin” and more. Here we’ll take a look at some of these features in more detail.
Albums
The first thing you’ll notice when you look at the list of albums in the Photos app is that the Camera Roll album is now called Recently Added.
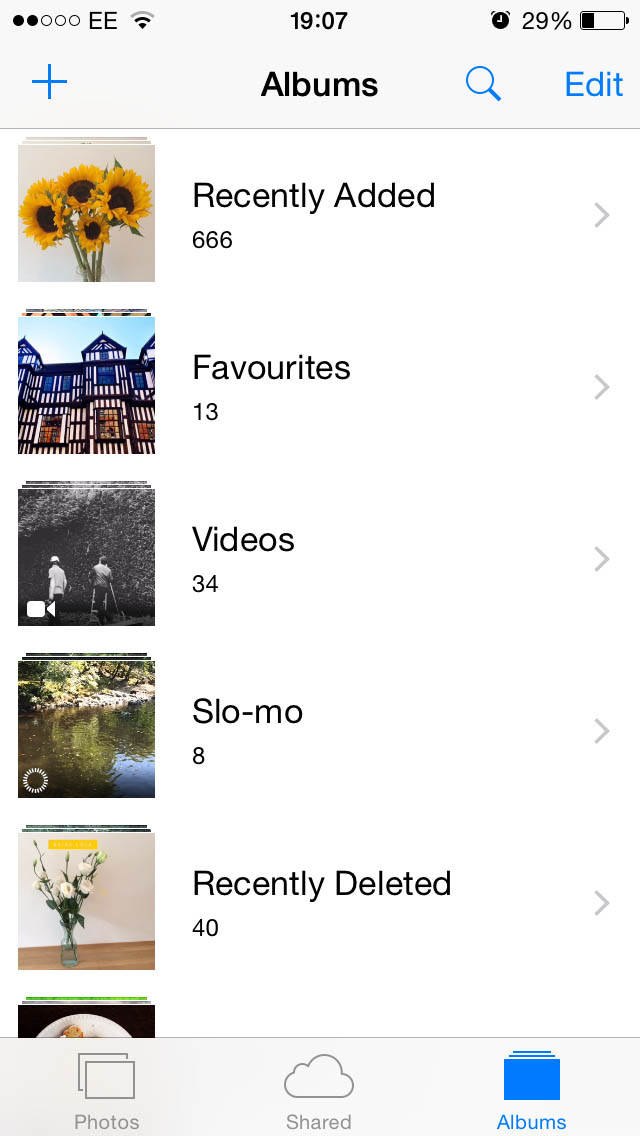
You’ll also notice a new album called Recently Deleted. Any photo that you delete will go into the Recently Deleted album.
If you accidentally delete a photo, go to the Recently Deleted album. Tap Select, then select the photo or photos you want to recover and tap Recover. The photos will be restored to the Recently Added album.
Items in the Recently Deleted album will be permanently erased from the album after 30 days – each photo shows the days remaining before it will be deleted.
To permanently delete images from the album before the 30 day time limit, select the photos, then tap Delete.
New Organize Options
The way you organize your photos into albums is very similar to iOS 7, however there are some useful new additions which we’ll take a look at now.
When you open an image in the Photos app, you’ll now see the location, date and time that the photo was taken at the top of the screen.
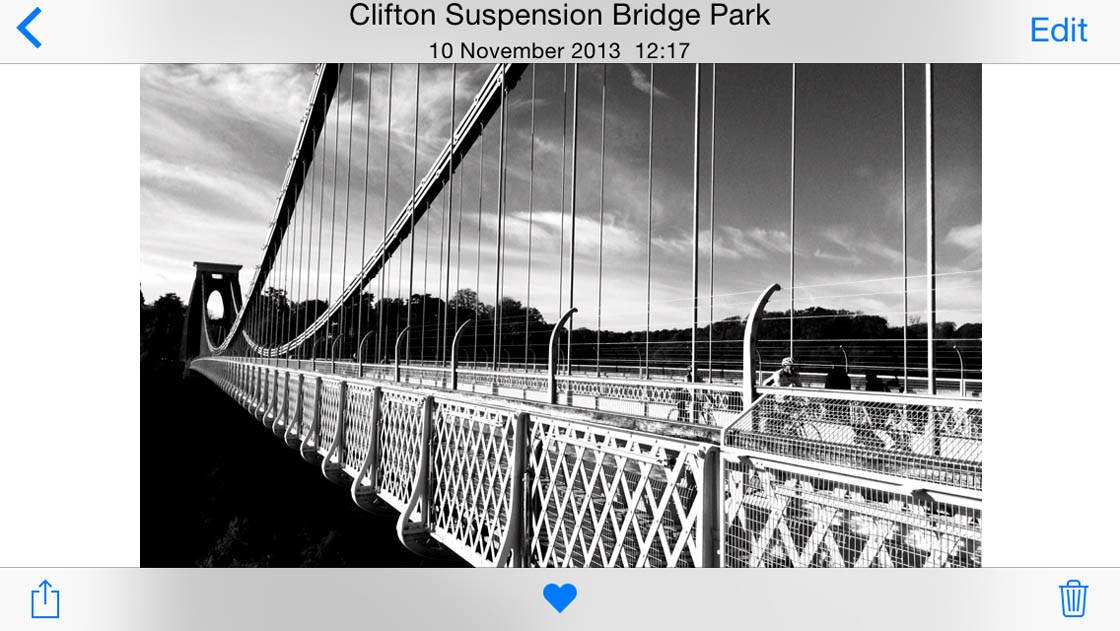
Beneath your photos, you’ll notice a new heart icon. This is the Favorites button and it lets you tag your favorite photos so that they appear together in the Favorites album. To add a photo to the Favorites album, simply tap the heart so that it turns blue.
If you go to your list of albums, you’ll notice a Favorites album which contains any photos you’ve tagged as favorites. You can unfavorite a photo by tapping the blue heart icon again.
Please note, if you use the delete option rather than tapping the blue heart icon to remove an image from the Favorites album, the image will be deleted and will only be available in the Recently Deleted album.
When viewing your list of albums, you’ll notice a new search icon to the left of the Edit button. Tapping the search button lets you search for photos by typing a location, album name, month or year.
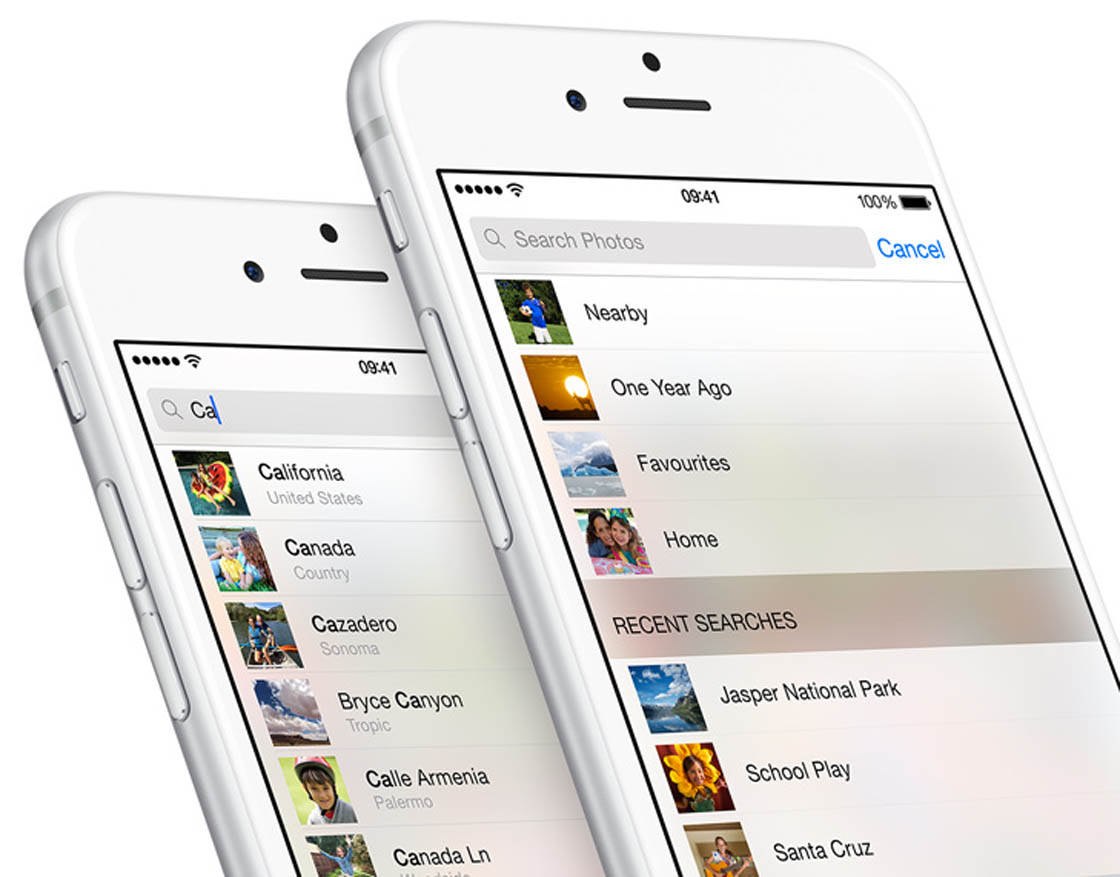
Alternatively, you can tap one of the suggested options in the list beneath the search box.
Crop/Straighten Tool
The Crop tool is no longer just for cropping! You can now straighten crooked images too. Open an image in the Photos app, tap Edit, then tap the Crop tool (shown surrounded with a grey box below).
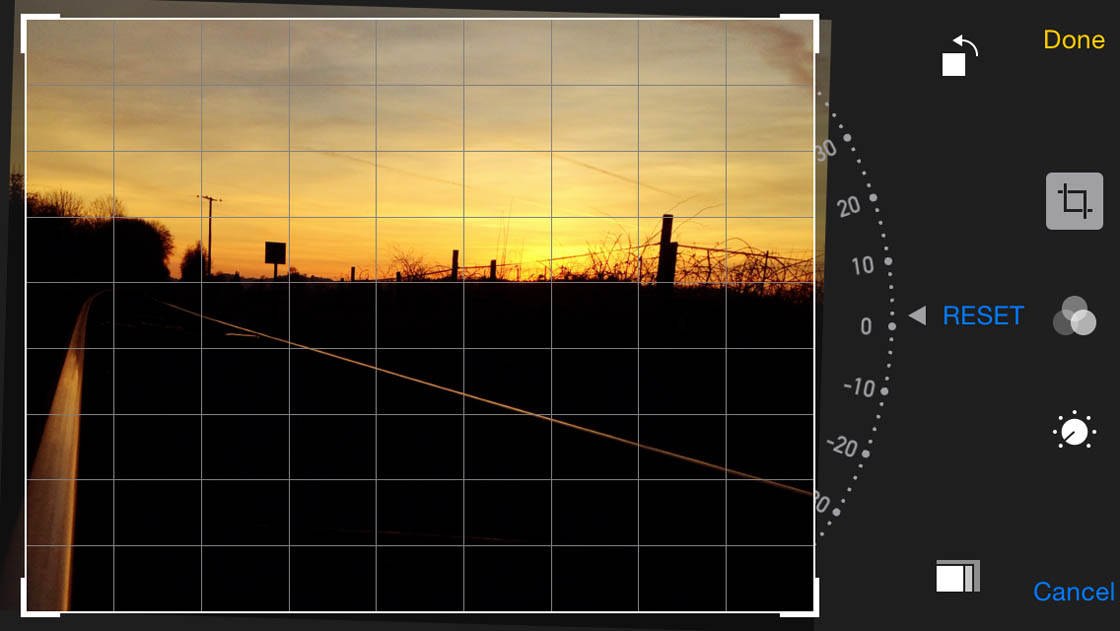
You’ll see a dial next to the photo. Rotate this dial left or right and a grid will appear which helps you straighten your image. When you release the dial, the edges of the rotated image will be cropped, leaving a straightened image.
The Reset button will reset the image back to its original state. The Rotate button (square with arrow icon) rotates the image 90 degrees at a time. The Aspect Ratio button (stacked rectangles icon) lets you select an aspect ratio for your crop.
Dragging the cropping handles on the corners of the image sets the cropped area, and dragging the image itself changes which area of the photo appears within the cropping handles.
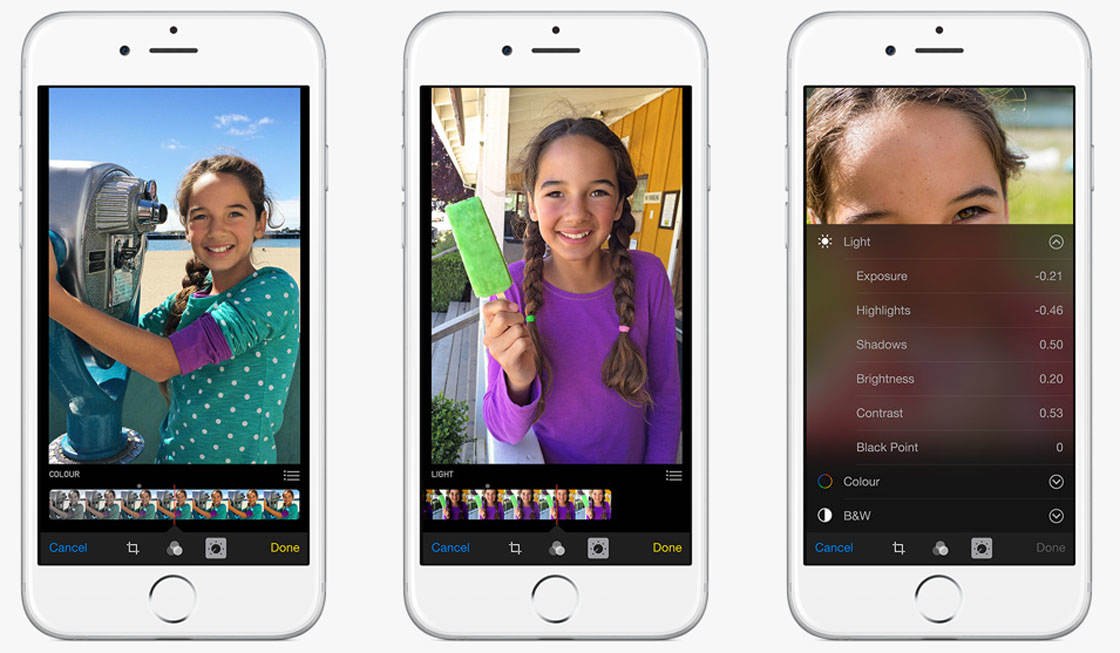
Photo Editing Tools
You can now edit photos on iPhone with an exciting set of new editing tools. Open an image in the Photos app, then tap Edit.
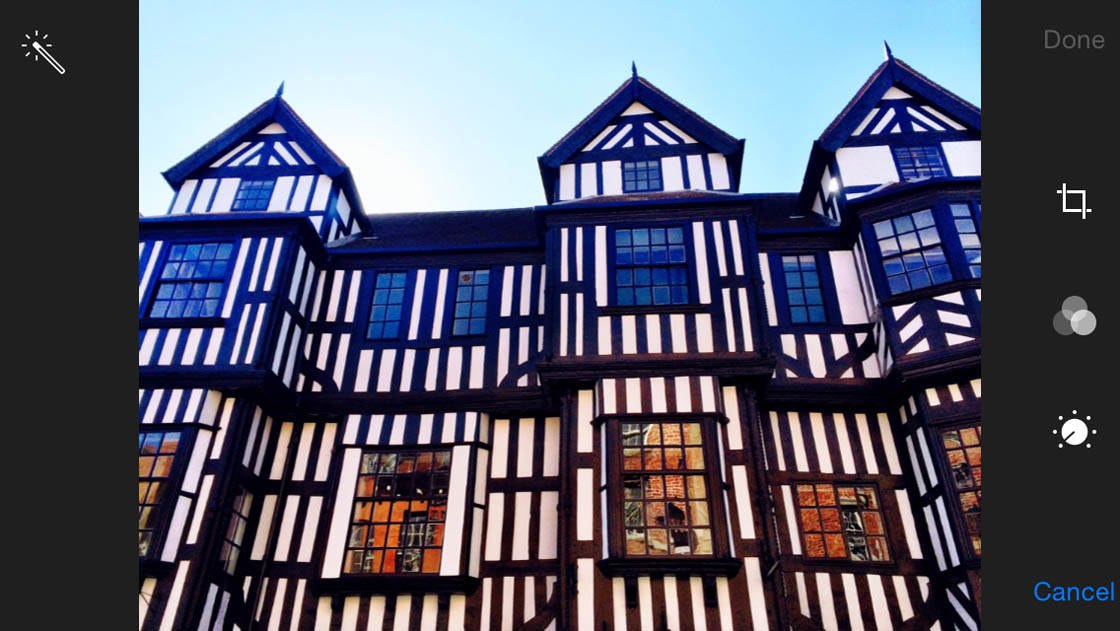
Tapping the wand tool shown above at the top left performs an automatic smart adjustment on exposure and color. This is useful in some circumstances where your photo is under or over-exposed. However, it doesn’t give you any control.
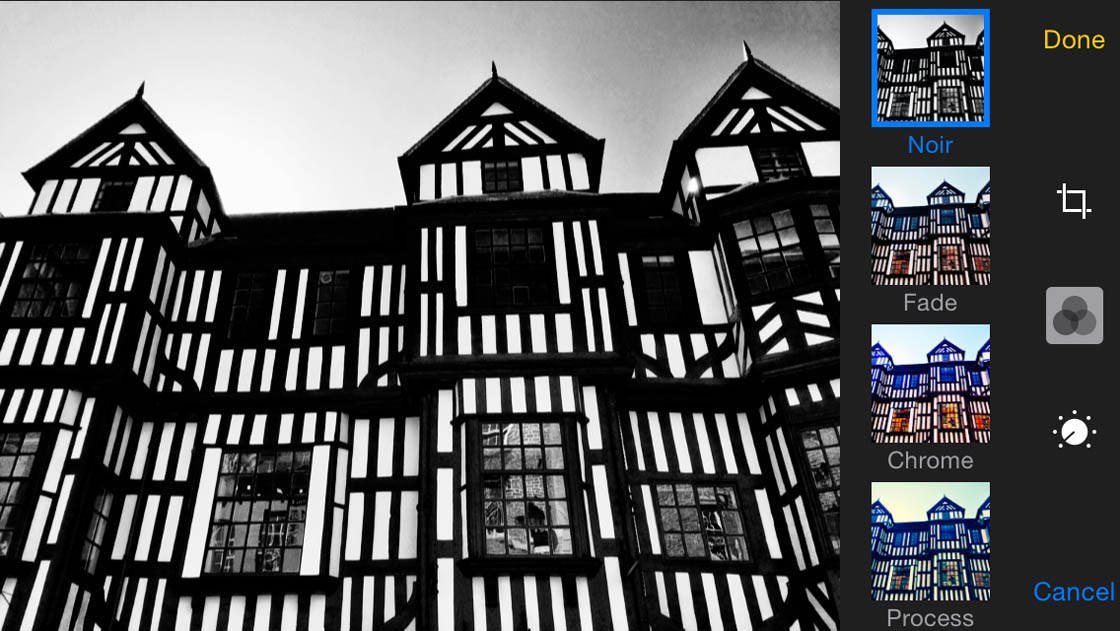
The Filters button (three circles icon) gives you access to the filters that you’re probably already familiar with. iOS 8 also makes it possible for other app developers to create filters and editing tools that you can use in the Photos app.
But the most exciting improvement to this app is the manual adjustments that you can make to exposure and color that were previously only available in third-party apps.
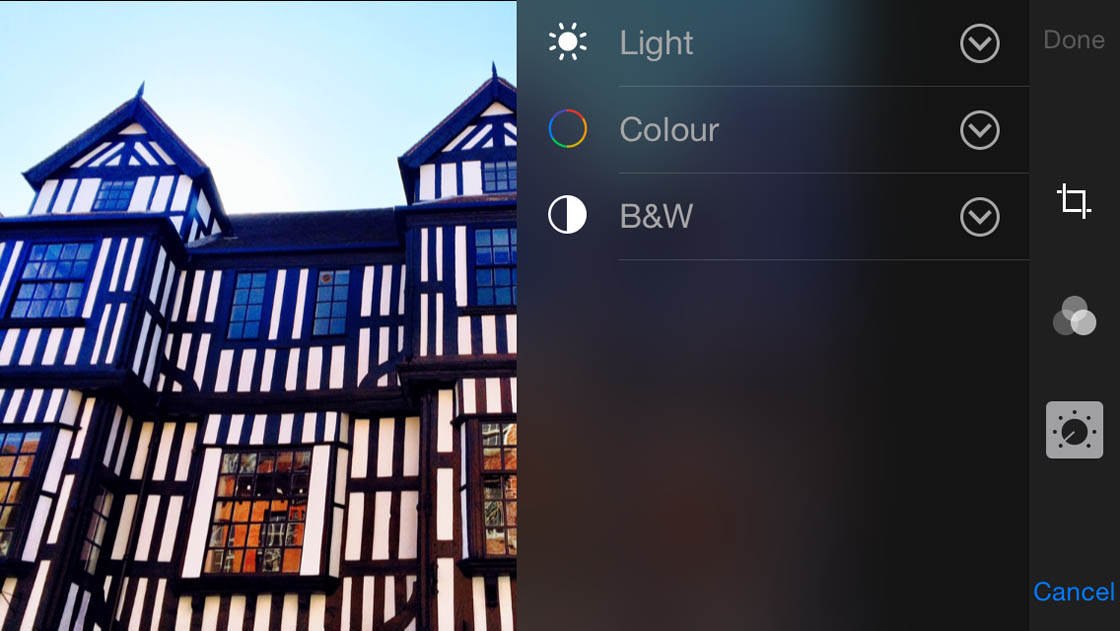
Tapping the Manual Adjustments button (dial icon) gives you three options – Light, Color and B&W. Tapping the arrows next to each option displays all of the settings that you can alter manually.
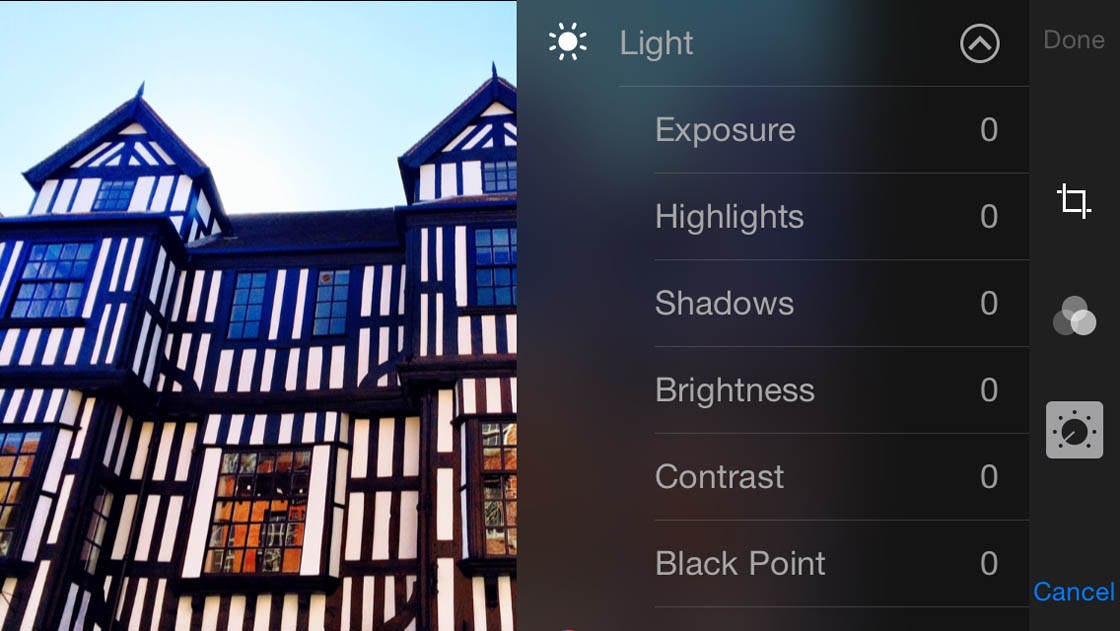
The Light option lets you alter exposure, highlights, shadows, brightness, contrast and black point.
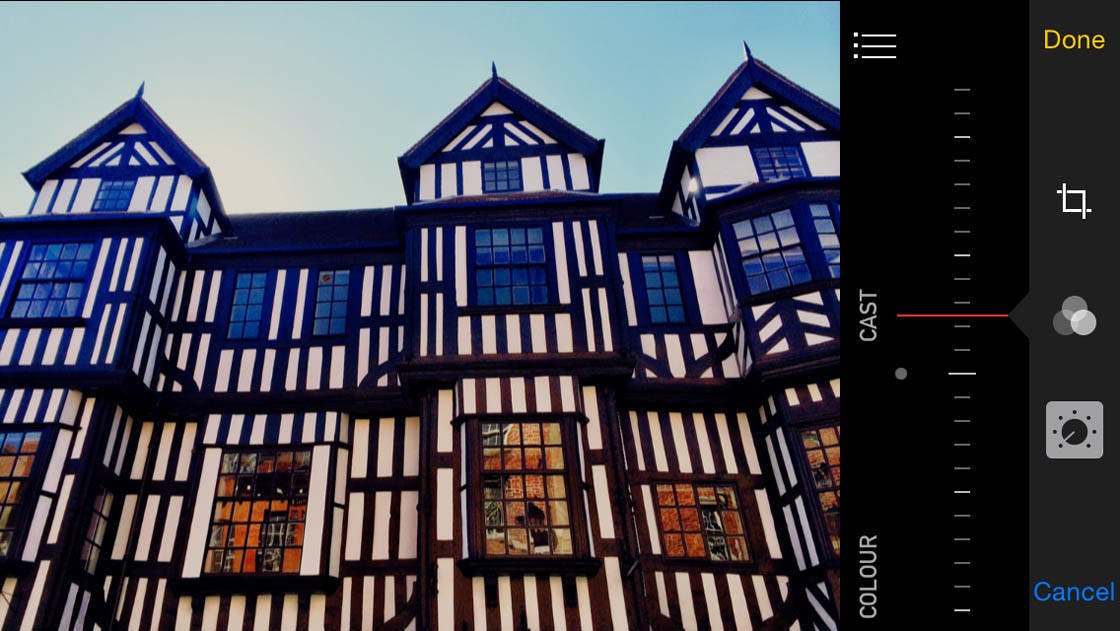
The Color option lets you adjust saturation, contrast and cast. The B&W option provides a variety of black and white adjustments such as intensity, neutrals, tone and grain.
Once you’ve chosen an option, use the slider to adjust the intensity. You can access the other settings again by tapping the menu button next to the slider, or simply swipe over the slider to toggle through them one at a time.
When you’ve finished editing, tap Done to confirm the changes or Cancel to discard them. After editing, you can always revert back to the original image at any time by tapping Edit > Revert.
It will be interesting to see whether the introduction of these manual adjustments will make certain third-party editing apps obsolete. It’s doubtful as they still tend to offer a lot more adjustment options and filters than the native Photos app.
But these new tools will certainly make it easier to quickly edit your photos without having to leave the Photos app.
iCloud Photos
There are also some developments with the iCloud storage facility. If you choose to enable iCloud Photos in the Settings app, every photo and video that you take will be automatically uploaded to iCloud.
This lets you keep all of your full resolution photos and videos in iCloud. Any edits that you make on a photo will be immediately uploaded to iCloud and become visible on your other iOS devices.
You can access and download the full resolution files from any of your iOS-enabled devices or via the web at any time. You’ll get 5GB of iCloud storage for free, and other storage plans can be paid for.
Summary
If you’re an iPhone photographer, I wouldn’t hesitate to update to iOS 8. This is the biggest overhaul we’ve seen to the camera and photo features in any iOS update, and is going to change the way we take, edit and store photos.
If you’re interested in the other new features of iOS 8 such as enhanced iCloud storage and iCloud Photo Sharing, voice and video messages in iMessage, a smarter keyboard, improved notifications, time-saving features for handling emails and an in-depth Health app, full details can be found on the Apple website.
